MICROSOFT ACCES
Microsoft Access is a Database Management System (DBMS) from Microsoft that combines the relational Microsoft Jet Database Engine with a graphical user interface and softwaredevelopment tools. It is a member of the Microsoft Office suite of applications, included in the professional and higher editions.
- Microsoft Access is just one part of Microsoft’s overall data management product strategy.
- It stores data in its own format based on the Access Jet Database Engine.
- Like relational databases, Microsoft Access also allows you to link related information easily. For example, customer and order data. However, Access 2013 also complements other database products because it has several powerful connectivity features.
- It can also import or link directly to data stored in other applications and databases.
- As its name implies, Access can work directly with data from other sources, including many popular PC database programs, with many SQL (Structured Query Language) databases on the desktop, on servers, on minicomputers, or on mainframes, and with data stored on Internet or intranet web servers.
- Access can also understand and use a wide variety of other data formats, including many other database file structures.
- You can export data to and import data from word processing files, spreadsheets, or database files directly.
- Access can work with most popular databases that support the Open Database Connectivity (ODBC) standard, including SQL Server, Oracle, and DB2.
- Software developers can use Microsoft Access to develop application software.
Microsoft Access stores information which is called a database. To use MS Access, you will need to follow these four steps −
- Database Creation − Create your Microsoft Access database and specify what kind of data you will be storing.
- Data Input − After your database is created, the data of every business day can be entered into the Access database.
- Query − This is a fancy term to basically describe the process of retrieving information from the database.
- Report (optional) − Information from the database is organized in a nice presentation that can be printed in an Access Report.
Architecture
- Access calls anything that can have a name an object. Within an Access desktop database, the main objects are tables, queries, forms, reports, macros, data macros, and modules.
- If you have worked with other database systems on desktop computers, you might have seen the term database used to refer to only those files in which you store data.
- But, in Access, a desktop database (.accdb) also includes all the major objects related to the stored data, including objects you define to automate the use of your data.
CREATE DATABASE
In this chapter, we will be covering the basic process of starting Access and creating a database. This chapter will also explain how to create a desktop database by using a template and how to build a database from scratch.
To create a database from a template, we first need to open MS Access and you will see the following screen in which different Access database templates are displayed.

To view the all the possible databases, you can scroll down or you can also use the search box.
Let us enter project in the search box and press Enter. You will see the database templates related to project management.
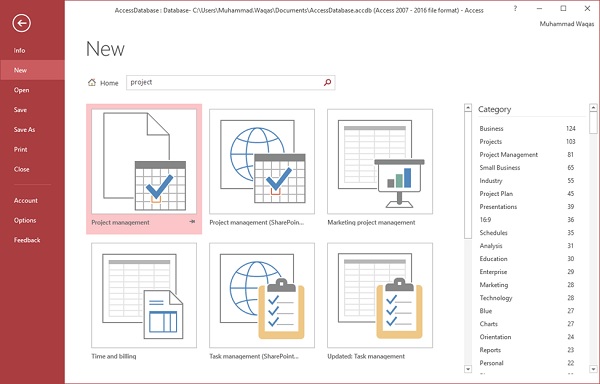
Select the first template. You will see more information related to this template.
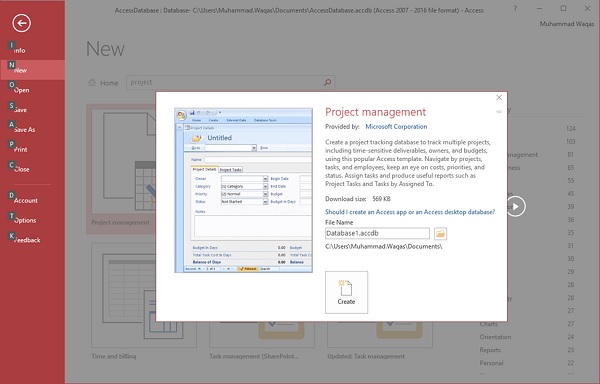
After selecting a template related to your requirements, enter a name in the File name field and you can also specify another location for your file if you want.
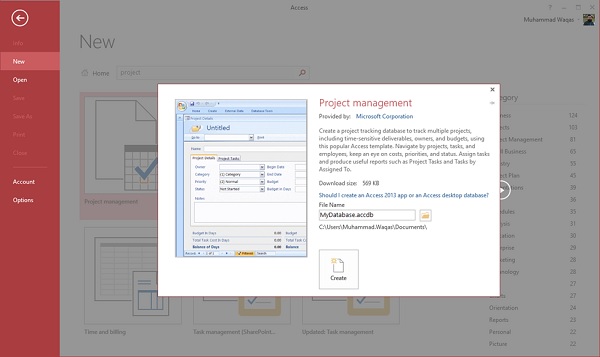
Now, press the Create option. Access will download that database template and open a new blank database as shown in the following screenshot.

Now, click the Navigation pane on the left side and you will see all the other objects that come with this database.
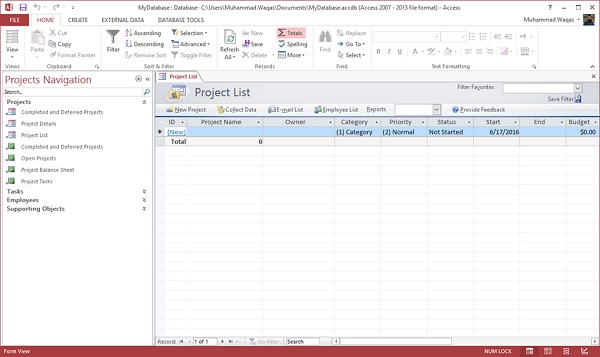
Click the Projects Navigation and select the Object Type in the menu.
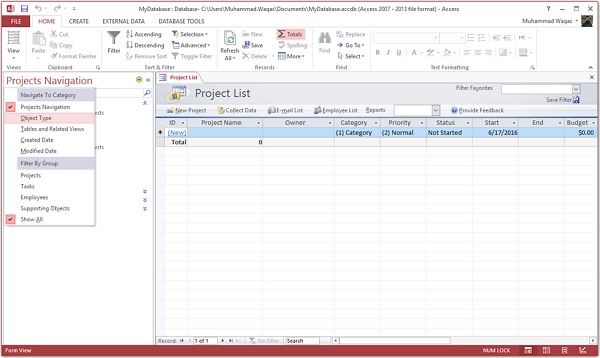
You will now see all the objects types — tables, queries, etc.
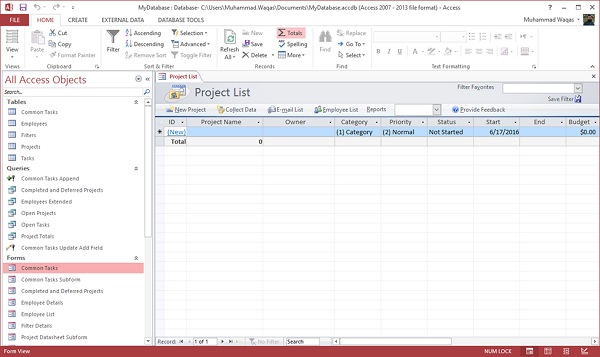
Create Blank Database
Sometimes database requirements can be so specific that using and modifying the existing templates requires more work than just creating a database from scratch. In such case, we make use of blank database.
Step 1 − Let us now start by opening MS Access.
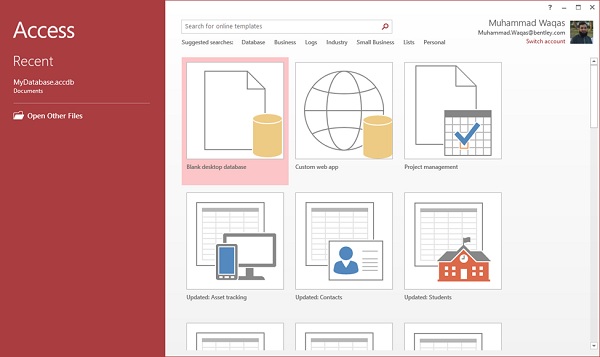
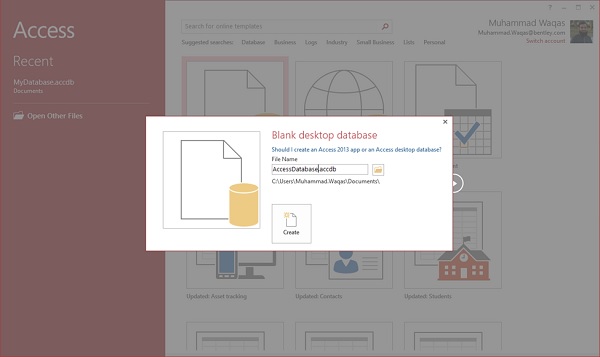
Step 2 − Select Blank desktop database. Enter the name and click the Create button.
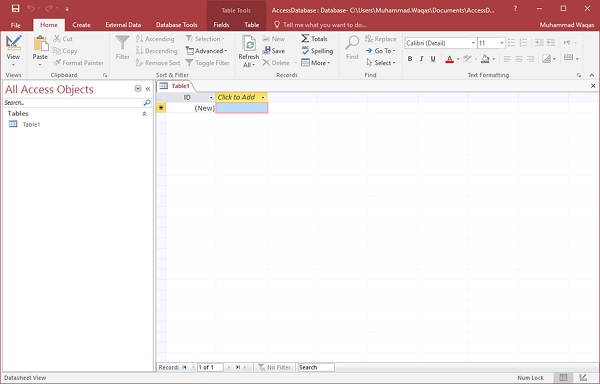
Step 3 − Access will create a new blank database and will open up the table which is also completely blank.
QUERY
A query is a request for data results, and for action on data. You can use a query to answer a simple question, to perform calculations, to combine data from different tables, or even to add, change, or delete table data.
- As tables grow in size they can have hundreds of thousands of records, which makes it impossible for the user to pick out specific records from that table.
- With a query you can apply a filter to the table's data, so that you only get the information that you want.
- Queries that you use to retrieve data from a table or to make calculations are called select queries.
- Queries that add, change, or delete data are called action queries.
- You can also use a query to supply data for a form or report.
- In a well-designed database, the data that you want to present by using a form or report is often located in several different tables.
- The tricky part of queries is that you must understand how to construct one before you can actually use them.
Create Select Query
If you want to review data from only certain fields in a table, or review data from multiple tables simultaneously or maybe just see the databased on certain criteria, you can use the Select query. Let us now look into a simple example in which we will create a simple query which will retrieve information from tblEmployees table. Open the database and click on the Create tab.
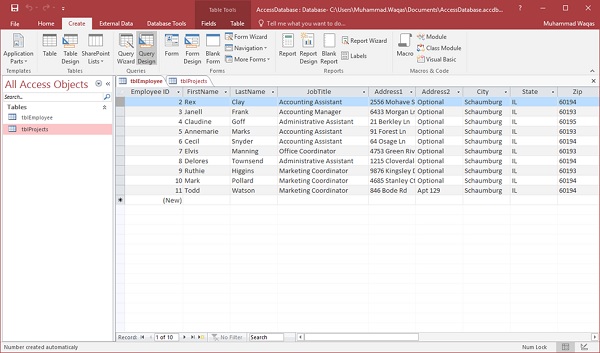
Click Query Design.
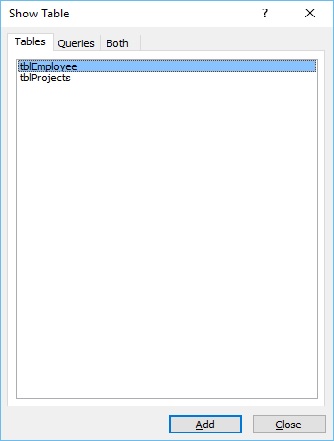
In the Tables tab, on the Show Table dialog, double-click the tblEmployeestable and then Close the dialog box.
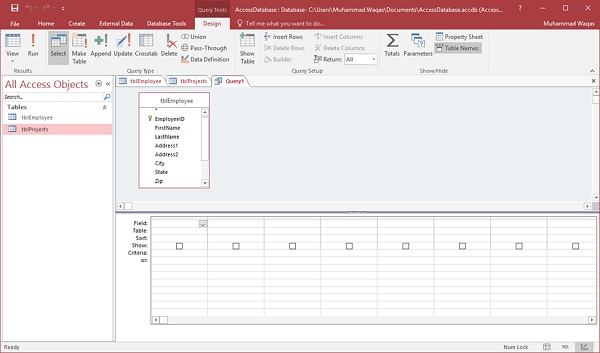
In the tblEmployees table, double-click all those fields which you want to see as result of the query. Add these fields to the query design grid as shown in the following screenshot.
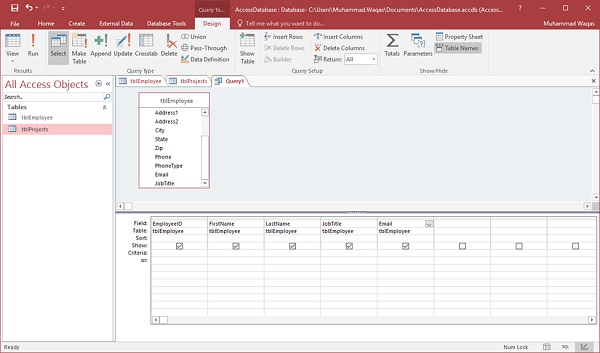
Now click Run on the Design tab, then click Run.

The query runs, and displays only data in those field which is specified in the query.
CREATE TABLES
When you create a database, you store your data in tables. Because other database objects depend so heavily on tables, you should always start your design of a database by creating all of its tables and then creating any other object. Before you create tables, carefully consider your requirements and determine all the tables that you need.
Let us try and create the first table that will store the basic contact information concerning the employees as shown in the following table −
| Field Name | Data Type |
|---|---|
| EmployeelD | AutoNumber |
| FirstName | Short Text |
| LastName | Short Text |
| Address1 | Short Text |
| Address2 | Short Text |
| City | Short Text |
| State | Short Text |
| Zip | Short Text |
| Phone | Short Text |
| Phone Type | Short Text |
Let us now have short text as the data type for all these fields and open a blank database in Access.

This is where we left things off. We created the database and then Access automatically opened up this table-one-datasheet view for a table.
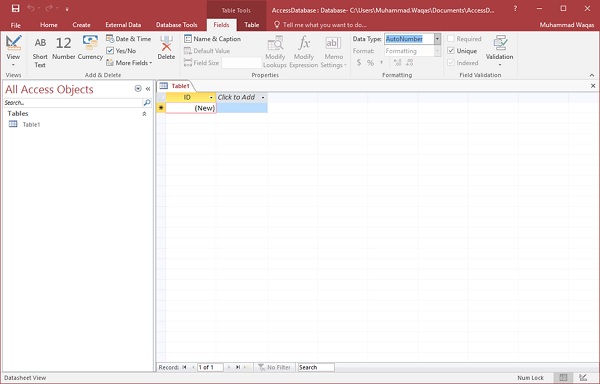
Let us now go to the Field tab and you will see that it is also automatically created. The ID which is an AutoNumber field acts as our unique identifier and is the primary key for this table.
The ID field has already been created and we now want to rename it to suit our conditions. This is an Employee table and this will be the unique identifier for our employees.
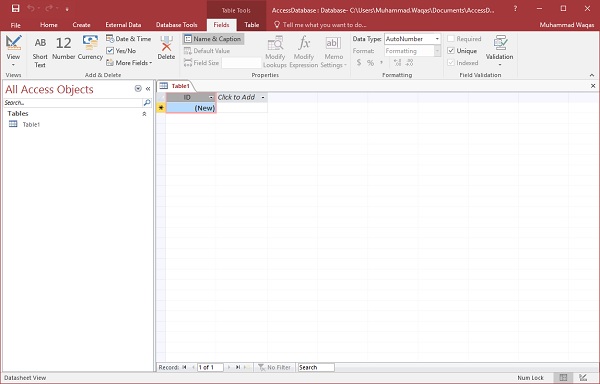
Click on the Name & Caption option in the Ribbon and you will see the following dialog box.
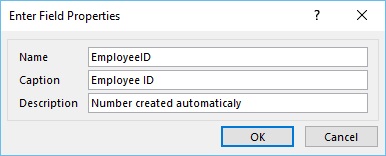
Change the name of this field to EmployeeID to make it more specific to this table. Enter the other optional information if you want and click Ok.

We now have our employee ID field with the caption Employee ID. This is automatically set to auto number so we don't really need to change the data type.
Let us now add some more fields by clicking on click to add.
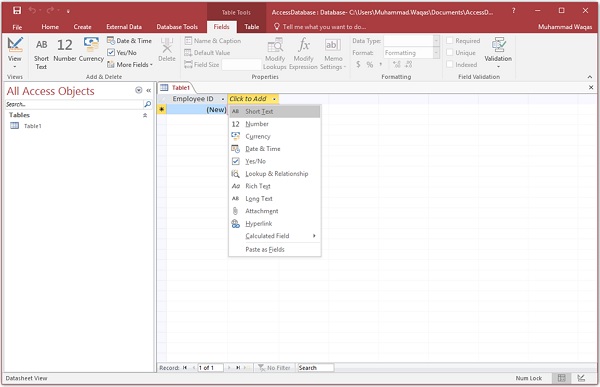
Choose Short Text as the field. When you choose short text, Access will then highlight that field name automatically and all you have to do is type the field name.
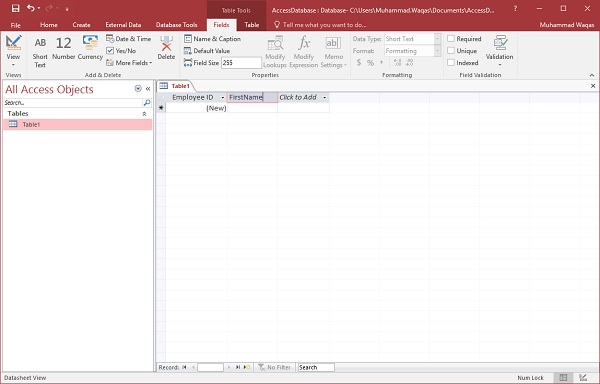
Type FirstName as the field name. Similarly, add all the required fields as shown in the following screenshot.
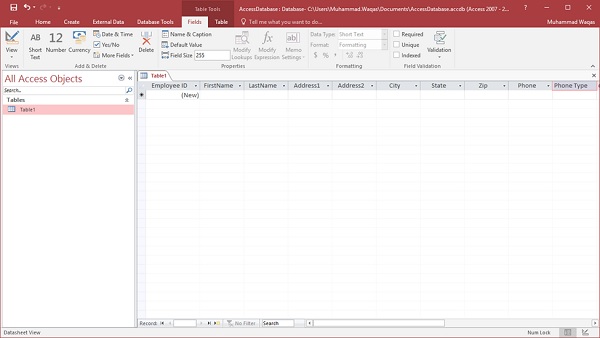
Once all the fields are added, click the Save icon.
You will now see the Save As dialog box, where you can enter a table name for the table.
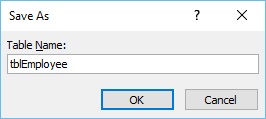
Enter the name of your table in the Table Name field. Here the tbl prefix stands for table. Let us click Ok and you will see your table in the navigation pane.

Table Design View
As we have already created one table using Datasheet View. We will now create another table using the Table Design View. We will be creating the following fields in this table. These tables will store some of the information for various book projects.
| Field Name | Data Type |
|---|---|
| Project ID | AutoNumber |
| ProjectName | Short Text |
| ManagingEditor | Short Text |
| Author | Short Text |
| PStatus | Short Text |
| Contracts | Attachment |
| ProjectStart | Date/Time |
| ProjectEnd | Date/Time |
| Budget | Currency |
| ProjectNotes | Long Text |
Let us now go to the Create tab.
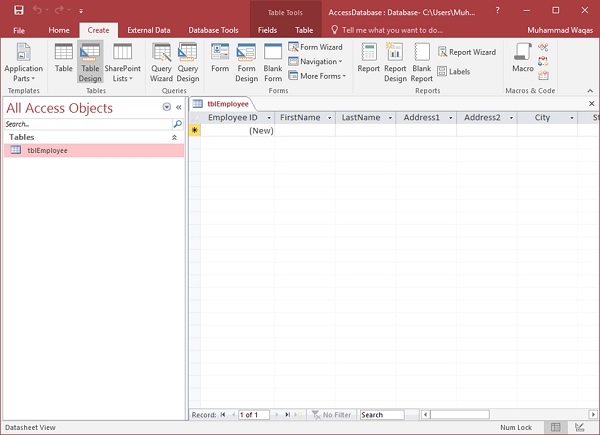
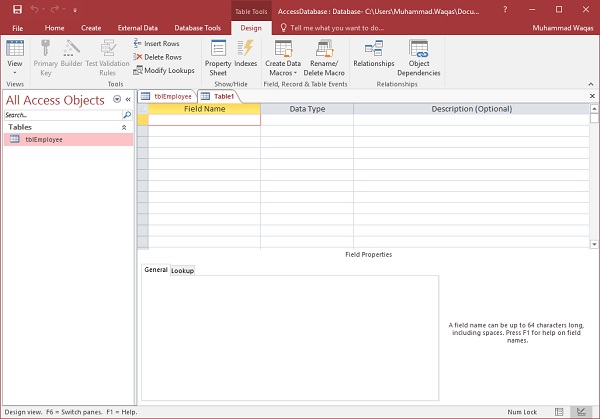
In the tables group, click on Table and you can see this looks completely different from the Datasheet View. In this view, you can see the field nameand data type side by side.
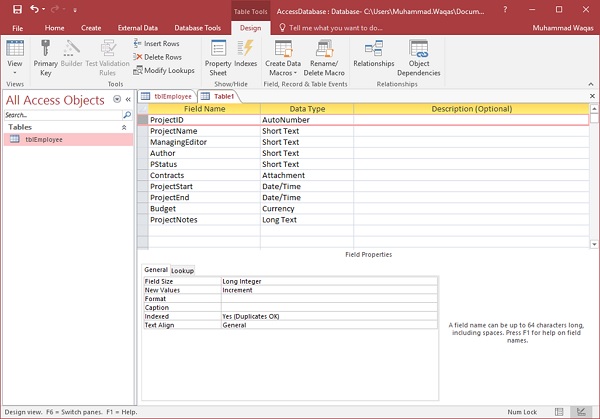
We now need to make ProjectID a primary key for this table, so let us select ProjectID and click on Primary Key option in the ribbon.
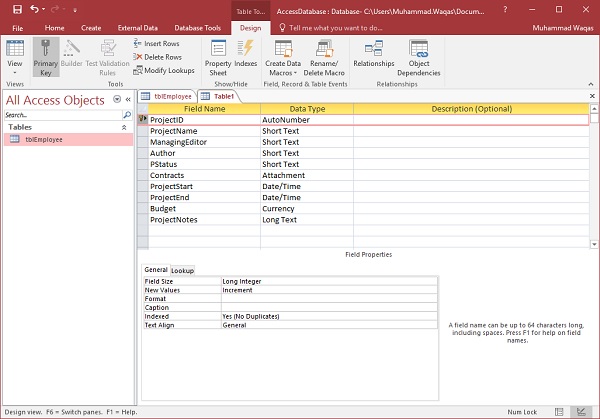
You can now see a little key icon that will show up next to that field. This shows that the field is part of the table’s primary key.
Let us save this table and give this table a name.
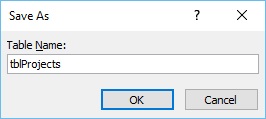
Click Ok and you can now see what this table looks like in the Datasheet View.
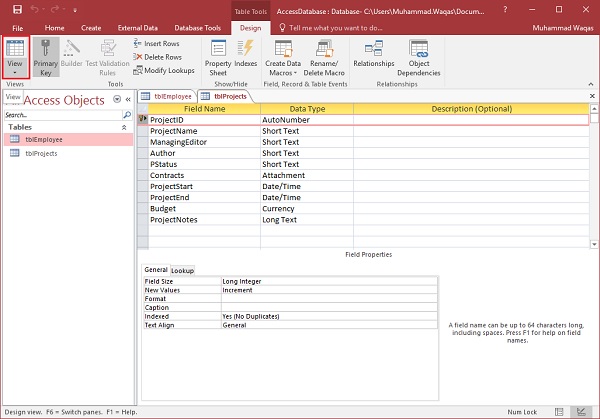
Let us click the datasheet view button on the top left corner of the ribbon.
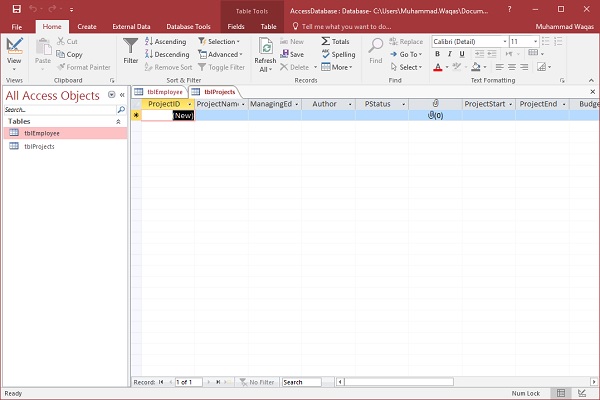
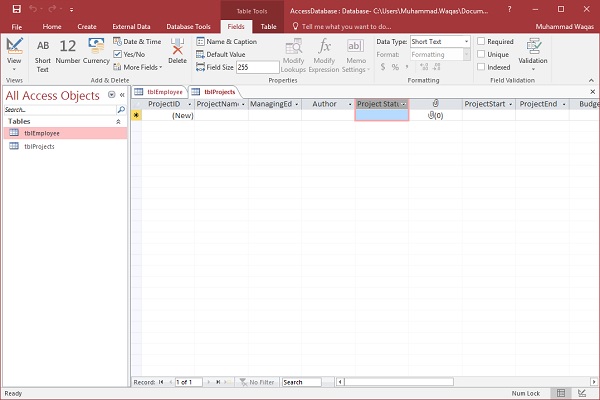
If you ever want to make changes to this table or any specific field, you don't always have to go back to the Design View to change it. You can also change it from the Datasheet View. Let us update the PStatus field as shown in the following screenshot.
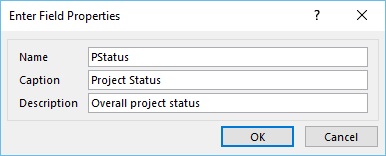
Click Ok and you will see the changes.
REPORTS
In this chapter, we will be covering the basics of reports and how to create reports. Reports offer a way to view, format, and summarize the information in your Microsoft Access database. For example, you can create a simple report of phone numbers for all your contacts.
- A report consists of information that is pulled from tables or queries, as well as information that is stored with the report design, such as labels, headings, and graphics.
- The tables or queries that provide the underlying data are also known as the report's record source.
- If the fields that you want to include all exist in a single table, use that table as the record source.
- If the fields are contained in more than one table, you need to use one or more queries as the record source.
Example
We will now take a simple example to understand the process of creating a very simple report. For this, we need to go to the Create tab.

Before clicking on the Report button to create a basic report, make sure the proper query is selected. In this case, qryCurrentProjects is selected in your navigation pane. Now click on the Report button, which will generate a report based on that query.
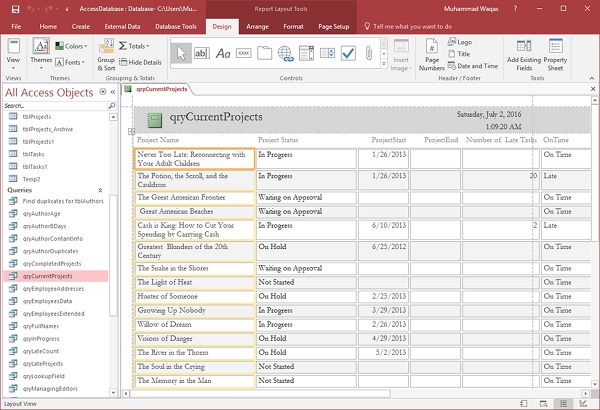
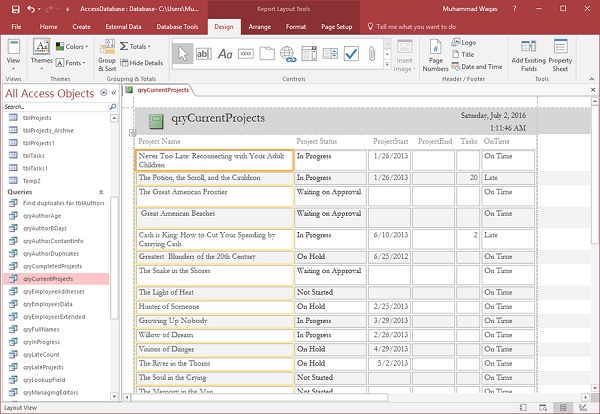
You will see that the report is open in Layout view. This provides a quick way to adjust the size or width of any of your fields that you see on the report. Let us now adjust the column widths to make everything fit in a better way.
Scroll down and adjust the page control at the bottom.
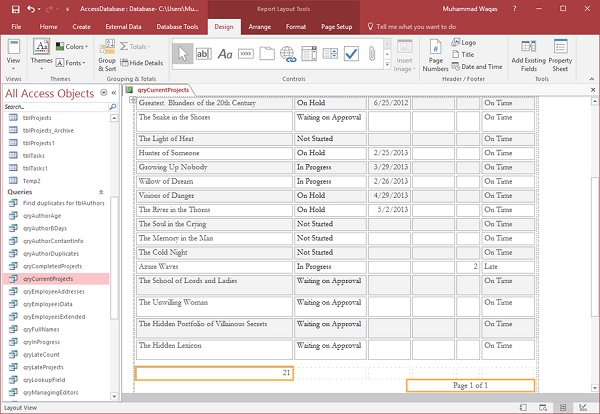
This was a very quick way to create a very simple report. You could also make minor changes and adjustments from the report design view.
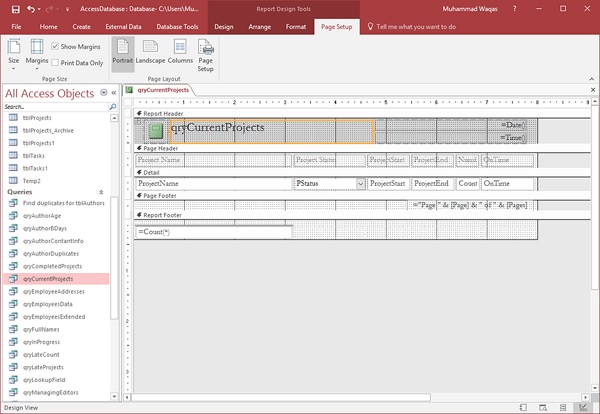
- Just like forms, a report is made up of a variety of different sections.
- You have the detail section, which is where all of your data lives for the most part.
- You also will see a page header and a page footer section; these appear at the top and at the bottom of every single page in your report.
Let us now change the Title of the report and give it another name.
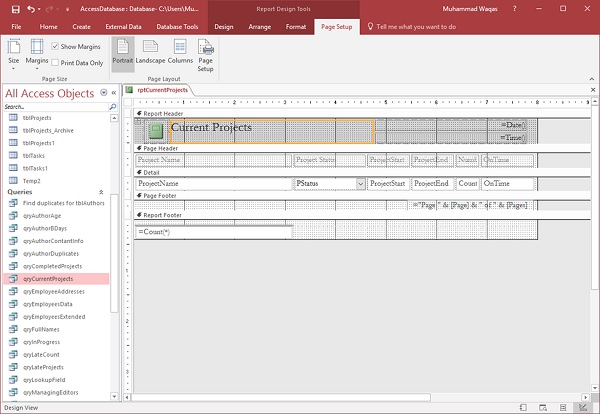
Click on the save icon to save your report.
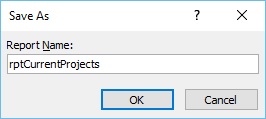
You will get the above dialog box.
Enter a name for your report and click Ok. If you want to view what this report will actually look like, in Print Preview, you can go back to the View button and click on Print Preview to see what this report would look like when printed either on paper or as a PDF.
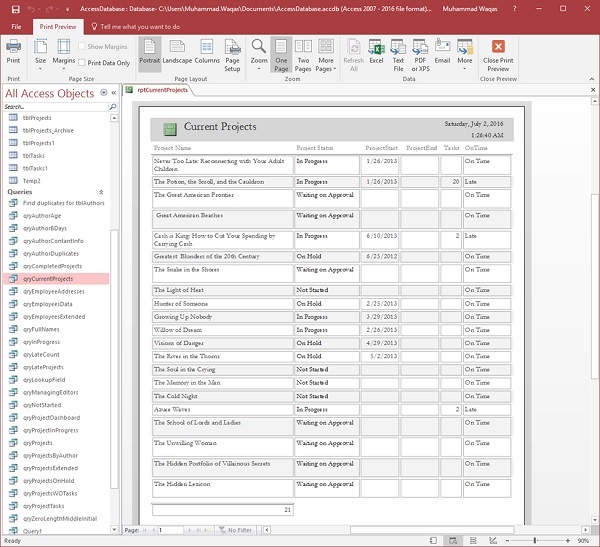
Using the tools on the lower right-hand corner, you can zoom in or zoom out. You also have some buttons on the Print Preview tab that appear automatically when you switch to Print Preview. In the zoom section, you've got a view for one page, two pages; or if you have a longer report, you can view four pages at once, eight pages or twelve pages. You can also adjust simple things such as the size of the paper that you are using to print, the margins for your report, the orientation, the number of columns, page set up, etc. And that is how you can create a very quick simple report using the Report button on the Create tab.
Create a Report Using Report Design
Report Design is another method for creating a quick report in Access. For this, we need to use the Report Design View button, which is like the Form Design button. This will create a blank report and open it directly to the Design View, allowing you to change the control source and add fields directly to the Design View of the report.
Let us now go to the Create tab and click on the Report Design button.
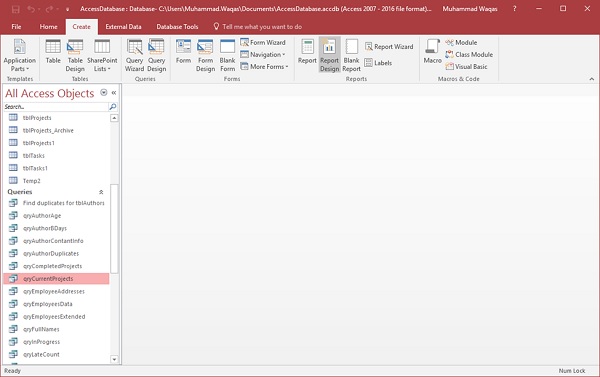
It will open a blank report or an unbound report, meaning this report is connected to no other object in our database.
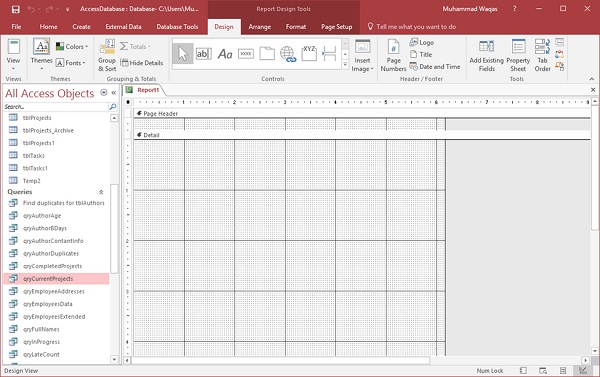
On the Design tab in the Tools group, select the Property Sheet. This will open up the Property pane.
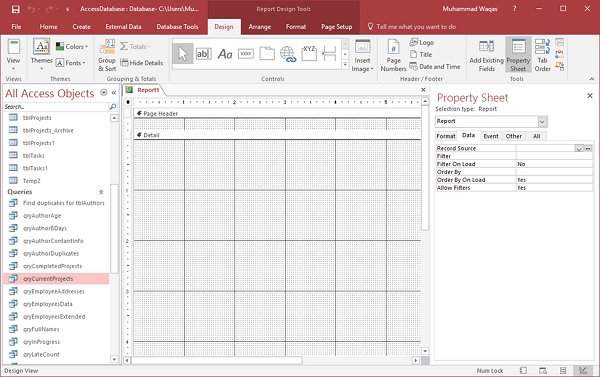
On the Data tab, assign a record source to this report, to connect it to a database object as in the following screenshot.
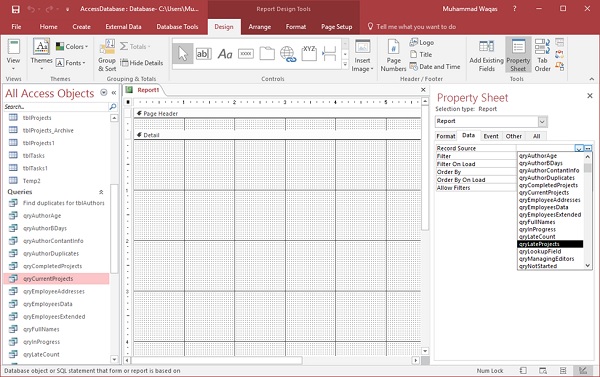
Select qryLateProjects from the drop-down and now, the next step is to go through and add some fields to this report by clicking on Add Existing Fields list button on the Design tab.
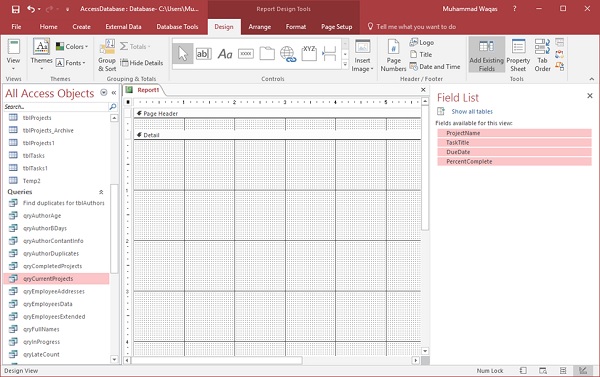
Select the fields as in the above screenshot.
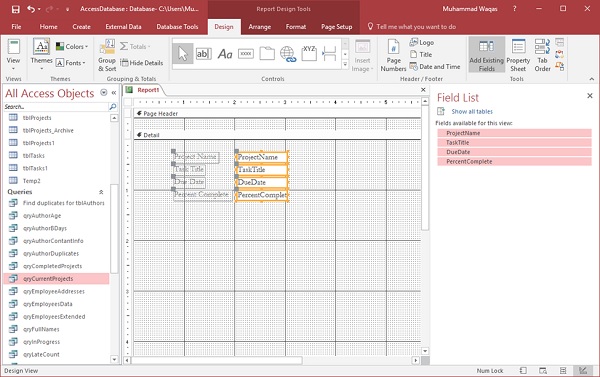
Drag the fields to you report as in the above screenshot. Go the Arrange tab, and in the Table group, you have a couple of options to choose from.
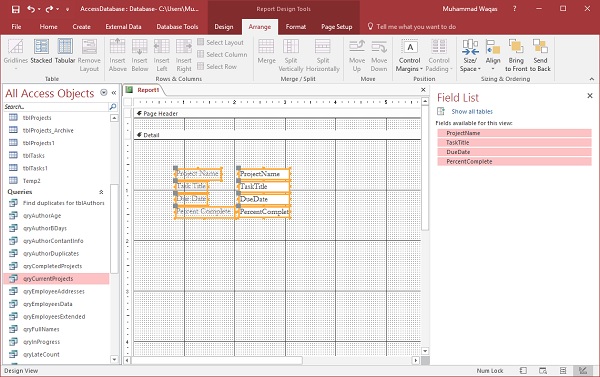
There is a stacked layout and a tabular layout, which is a layout that is very similar to a spreadsheet. Let us select the tabular layout.
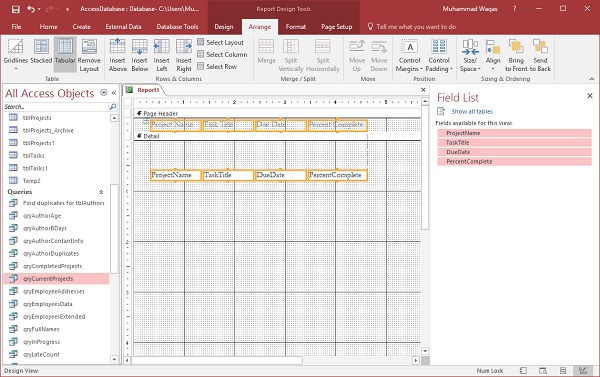
You can see that it moves all of the labels up to the page header area. These labels will appear only once at the top of every page and the data query will repeat for every record in the Details section. Now, you can go through and make some adjustments to make your ProjectName field wider.
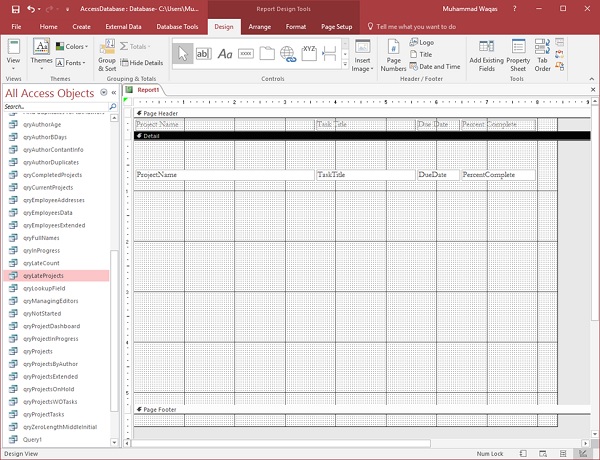
As you can see in the above screenshot, there is a lot of space between Detail section and Page Footer.
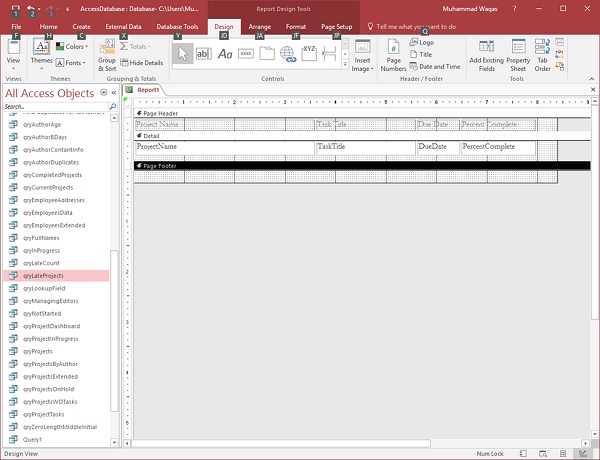
Let us drag the Page Footer up to reduce the space as in the following screenshot. We will now go to the Design tab and click on the View button and choose Report View.
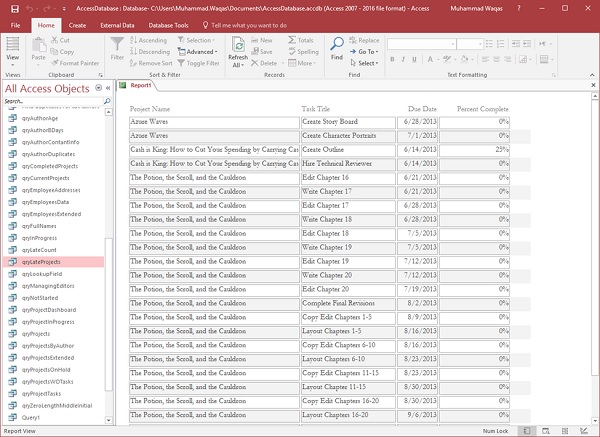
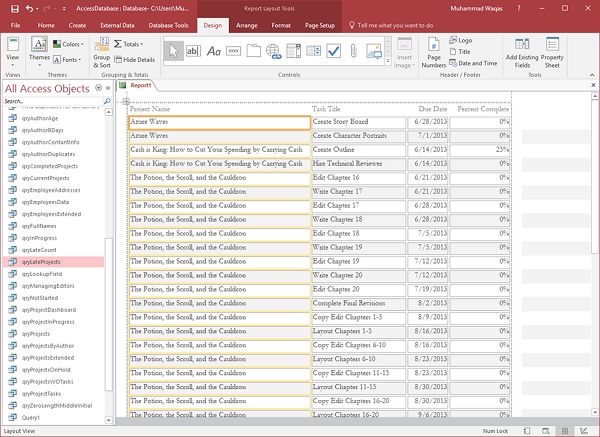
You can now see that some project names are not complete; you can adjust this with either the design view, or you can use the layout view to do that.
Comments
Post a Comment